
Single sign-on (SSO) has a user authenticate a single time. Then when the user opens other apps, the original authentication is used, instead of having them authenticate separately for each one. The user benefits from accumulated time savings. But the design of our applications can benefit, too.
This claim may seem like a stretch if you haven't yet worked with SSO. You may find it overly-complicated when you first see the steps involved. And as a third-party integration it can stoke worries of being another gruelling process of taking stabs into the dark until you find something that works.
But after the initial apprehensions, there's a lot to like.
- If the user is already in the SSO provider's system, they won't need to make a new account when first accessing your app. This avoids an otherwise big obstacle to user acquisition.
- You won't ever have to worry about your app managing credentials. This may simplify your operations, too, if the org behind the SSO provider handles support for e.g. users losing their credentials.
- Aside from perhaps a user ID, you'll probably not have to store any user biographical or contact details, which reduces your app's compliance footprint when it comes to personally identifiable information. Your app can instead get these details from the SSO provider.
- And get to just skip having a log-in page.
As for the SSO process, which may seem overly-complicated: once you've gained familiarity with it, it instead feels logical and intuitive.
If you're a web app developer and want to use SSO, or are already using SSO and want to know more about it, read on.
Kinds of SSO used in web apps
The SSO provider your app uses will be a separately-hosted third party app. Most likely the provider will be managed either by some other org in your company, or as a service by another company.
Two kinds of SSO are predominant in the web app world:
-
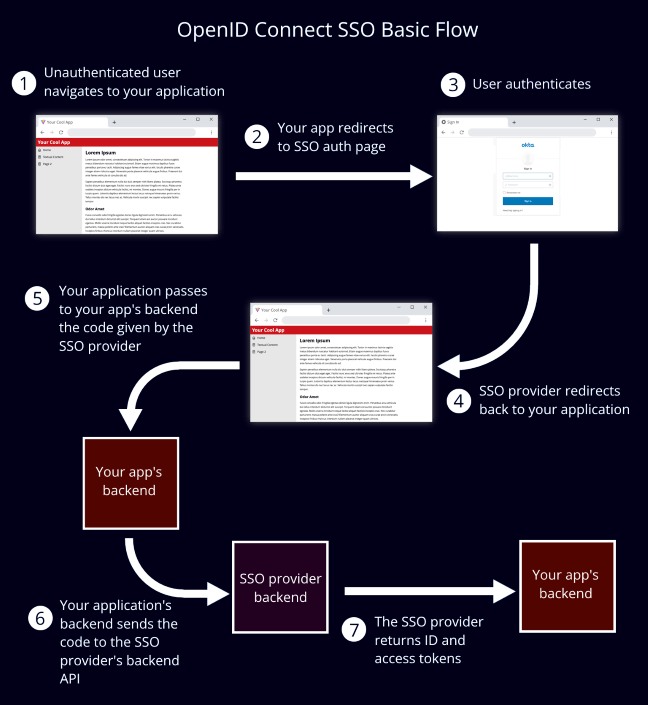
OpenID Connect (OIDC): This is what you'll most often find these days. Your app will redirect to the SSO provider, where authentication will be performed. It'll then redirect back to your app with a code, which your app then exchanges for a token. Your app can also get from it basic info about the end user. It's built on OAuth 2.0, so if you have any familiarity with that, you'll also recognize it in OIDC.
- OAuth 2.0: There are some apps that practice the use of non-OIDC OAuth 2.0 in the role of an authentication service, despite that not being its intended purpose. This is done by using the OAuth access token to fetch user info from the OAuth provider. In such cases, it is essentially the same flow as OIDC, except there is no ID token.
-
SAML: Previously the king of web-based SSO, but has lost a lot of share in the past decade to OIDC. It makes exclusive use of XML, with all the bloat that can be expected from that, and so if you have a choice I'd recommend the more modern and streamlined OIDC.
The remainder of this article will focus on OIDC (with applicability to OAuth 2.0 due to the similarity of the systems).
Is your SSO system using OIDC?
If you're currently working on a web app that uses SSO, you are probably already using OIDC if it does the following:
- Your app needs to redirect to a third party when a user needs to log in.
- The user authenticates on the third party, which redirects back to your app with a code.
- Your app exchanges this code for a token via an API endpoint on the third party.
The OIDC flow, step-by-step
Onboarding your app to an SSO provider
There are some minimal details you'll need to know about your SSO provider, and your SSO provider will need to know about your app, before you can integrate the two.
You need to know:
- The URL of the SSO provider's authentication page.
- The URL of the SSO provider's token endpoint.
The SSO provider needs to know:
- The URL (or URLs) of your app to which it will be asked to redirect to.
And you both need to know a client ID. This will be a text string that uniquely identifies your app to the SSO provider. It'll likely be supplied to you by the SSO provider, perhaps after some input from you.
The above is just the minimum that would apply to every situation. Your SSO provider may have further requirements or other instructions to provide to you.
Redirecting the user to the SSO auth page
The flow starts with your app redirecting to the SSO provider's authentication page. Before redirecting your app will need to add some request parameters to the end of the URL. These are:
response_type: The value of this should always becodefor the purpose of the flow described in this article.scope: This is a list of keywords that will later determine what info about the user you can get. One of the scopes must always beopenid. Other scopes you can specify includeprofile,email,address, andphone. Some implementations may allow for more than these.- The keywords are to be separated from each other by spaces. When percent-encoded each space will become
%20, and so the value of this parameter in the URL would look likeopenid%20profile%20email.
- The keywords are to be separated from each other by spaces. When percent-encoded each space will become
client_id: The value of this will be the client ID from your onboarding with the SSO provider.redirect_uri: This is your app's URL (or one of your app's URLs) that you provided to the SSO provider during oboarding. This must be an exact match of a URL that the SSO provider associates to your app.
Putting these all together, and having as example your SSO provider's auth page at https://sso.company.com/auth, means your full URL will look something like the below (line wraps for display purposes only):
https://sso.company.com/auth
    ?response_type=code
    &client_id=cool_app
    &scope=openid%20profile%20email
    &redirect_uri=https%3A%2F%2Fmycoolapp.com%2Fhome
The parameters mentioned so far are the mandatory ones. You may optionally also include:
nonce: This is a string of text that the SSO provider will eventually return to your app as a field in the ID token. You can use this as a security measure to ensure that the ID token came from the same authentication attempt as this redirect. And if your app makes subsequent use of ID tokens after its initial receipt of them, and you implement a way to identify nonces as outdated or invalid, you can use this to prevent replay attacks that use old tokens.state: This is a string of text that will be returned as-is when the auth page redirects back to your app. The SSO provider makes no other use of it. It's purpose is simply for there to be some connection between the user's session prior to the redirect, and the session after the redirect.- If the value of
statehas a cryptographically random component, it can be used to prevent cross-site request forgery by ensuring the flow had a legitimate initiation from your app. - You can also use it to carry state from one session to the next without the need for local or remote storage.
- If the value of
The above are just some of the commonly-used parameters. Other implementations of OIDC may allow for more.
After this redirect, the user will be on the SSO provider's auth page, and will enter credentials or follow some other authentication flow.
Redirection back to your app
The SSO provider will redirect back to the URL you provided once the authentication attempt resolves. If successful, it'll have added to this URL a request parameter of its own: code. (As well as the state param, if applicable.)
Your backend API will need to have and endpoint to which this code can be sent in exchange for a token. Your UI will read the code from the URL and call this endpoint with it.
What if the auth attempt failed?
The things that happen on the SSO auth page are out of your control. User or software errors may occur, and then it'll redirect, and your app will have to be graceful in dealing with it. Or in some cases the user might be correctly designated as not having access. Your app will have to handle this, too.
Your app won't find a code parameter in situations like this. Instead there will be an error parameter, which will contain a code that lets you know more about what kind of error it was. There are a lot of possible codes, too many to list them all here, but some notable ones are:
invalid_requestunauthorized_clientaccess_deniedserver_error
It could be that this error code is all your app gets. But some SSO providers may additionally include an error_description parameter having more info. There's no standard for the content of this param, so seek details on it from your SSO provider or test it out and find what it includes.
The endpoint for exchanging the code for a token
So the user has authenticated and your app now has the resulting code. Your first thought may be that this is where the SSO process should end. The user's authenticated and back at your app, right?
But no. From the standpoint of your UI, all it knows is that it has just been loaded up in a browser and has found a code in the URL. This code may have been the result of a successful authentication. Or it may just be some gibberish put there by a mischievous would-be user.
And so your application will need to give this code to the SSO provider and get the final proof of validity in the form of a token. OIDC does this through calls to the SSO provider's backend API, and so avoids more redirects.
I highly recommend that these calls to the SSO provider's backend be made from your app's backend, and not your app's UI. (See for the rationale the below section "Why it's a good practice to call the SSO backend from your app's backend, and not your app's UI".) So create an endpoint on your API that the UI will use to send a code and receive back a token.
When this endpoint is called your API will itself call the SSO provider's API. The OIDC specification calls for this to be a POST request in which the Content-Type header is application/x-www-form-urlencoded and the request body is accordingly URL-encoded (AKA percent-encoded). Below is the structure you can expect the request body to have (line wraps for display purposes only):
redirect_uri=<redirect-url-used-in-auth-url-goes-here>
    &grant_type=authorization_code
    &code=<code-goes-here>
Have your API logic swap in the redirect URL and the code.
Additionally, there's a good chance your SSO provider will have an authorization header requirement you must follow. Keep an eye out for this in its instructions and onboarding details.
A successful response will have a structure like the below:
{
    "access_token": "<access-token>",
    "token_type": "Bearer",
    "expires_in": 14400,
    "id_token": "<ID-token>"
}
And an unsuccessful response like the below:
{
    "error": "<error-code>"
}
The ID token of a successful request will be in JWT format. A good practice you should follow is to validate this token whenever you receive it, which can be done with one of these libraries. Your backend can then examine the token and get from it whatever your app needs.
What I like to do as a general default practice at this point, is to create a JWT specific to my app having in it details learned about the user from the ID token and/or SSO provider. Then sign it, and put it in the cookie that is sent with the response.
Obtaining user info
By this point the authentication is complete. But your app will often need more info about who it was that just authenticated. It could be that you need some kind of user ID to correlate this session with previous or future sessions. Or you may need details such as the user's name or email address.
How you get user info will depend on the implementation of your SSO provider:
- It's common, but not universal, for OIDC providers to put user info in the ID token. Since this token will have a JWT structure, you'll get this info by decoding the payload (i.e. middle) section. This will contain a JSON having the user info data.
- All OIDC providers will have an API endpoint you can call with the access token to get user info. OAuth 2.0 providers may also expose this. Calling this will mean sending a GET request having an Authorization header in the form:
Authorization: Bearer <access-token>. The URL of the endpoint will vary with the SSO provider.
In both above cases the data that will be available will depend on the value of the scope request parameter in your app's initial redirection to the SSO authentication page.
What all this means for the design of your UI
Knowing the sequence of steps in the OIDC flow is one thing. But when it comes to actually implementing the parts of this flow your app's UI is responsible for, it can quickly get a lot trickier. There are several things your UI logic needs to check and an order they must be checked in. When things go wrong they can be disastrous: the user being constantly redirected back and forth, frustrated and completely unable to use your app.
The below shows a high level overview of how this logic can proceed:

Further considerations:
When to start this flow
The flowchart starts when "your app's page loads", but this doesn't necessarily need to be the case.
- Does it make sense as a use case for an unauthenticated guest user to be using your app?
- Is there anything that can be done on your app by a user who isn't known and authenticated?
- Does your app not have any sensitive data which should only be viewed by known users who have access to it?
If your answer to all these questions is "yes", then you wouldn't want to put the user through an authentication flow immediately. Instead, the SSO process can begin when they e.g. click a "Log In" button. (In this scenario, remember to use the state request param, or some other way of conserving state from before the redirect to after, or else the user would lose whatever they did prior to clicking "Log In".)
Error handling
As any failure in this process is likely to render your application unusable, it's extra important that any potential deviation from the "happy path" (or path in which everything succeeds) be handled. Be paranoid and creative in your thinking about what could go wrong.
Contextualizing "Access Denied"
It'd be a good idea to contextualize the message shown to a user in the event of a failure in the flow. For example, if your app finds an error param or if its code-token exchange fails, it might not always be that the user doesn't have access. (For example, if there was a general server error instead of a recognized auth error.) Have your message let the user know if there is something they ought to do.
Logic that should only run upon having a valid token
If your app has a lot of user-specific content, or sensitive data that only entitled users should see, then you'll need to prevent these from loading or being fetched until your app gets a valid token. So remember to add this at the end of your SSO flow, and have the design of the rest of your app be informed by the fact that much of its content will be asynchronously loaded.
(And remember: it's not just the display of sensitive data that your app is holding back until it gets a token. The API calls that fetch this data must also be held back, or else unauthorized users will be able to see it just by examining the browser's requests.)
Mocking SSO in lower environments
An obstacle you may face in both initial building of your app, and its continued development, is a lack of an SSO provider to use in your local and development environments. Without one, you'll have to push, build, and deploy your app every time you make a change and want to test whether it works with SSO. I never wanted to have this problem again, and so I made Dev SSO IdP, a free, open source mock SSO server for use in development.
You can run it locally with Node or Docker, or deploy it to a lower environment so others on your team can use it as well. And it lets you quickly iterate when adding SSO to your project.
Why it's a good practice to call the SSO backend from your app's backend, and not your app's UI
Can't your UI just call the SSO provider's backend API directly, instead of adding the additional step of going to your own backend, which necessitates adding a whole new endpoint to your API? Well, you can. As in, it's possible. But it's not a good idea.
- If your SSO provider needs you to add a basic auth header, your credentials will be exposed when outgoing requests are examined. This is a showstopper if it pertains to your situation.
- It completely hands over control of access to your application to the SSO provider. If you instead had it go through a token endpoint on your API, then you can have a single endpoint of your own for all things pertaining to access to your app. It can handle issuing of tokens (including tokens specific to your app, not just the ones returned by the SSO provider) and also allows for other considerations such as tweaking granularity of access based on the user.
- It will make your application more tightly coupled to a particular SSO provider, in that you'll need to make changes in your UI should you want to switch to a different SSO provider. (If on the other hand you send your token request from your backend, and dynamically provide your UI with the client ID and URL of the SSO page, they are completely decoupled.)
And so you're going to be happier in the long run if you handle the code-token exchange on your backend. It comes with a larger scope of work than just handling everything in your UI, but it makes your app resilient to future changes in your environment and requirements.
SSO Providers I can recommend
- Okta's Auth0: The market leader in SSO-as-a-service. Okta is very developer-centric and so focuses on making onboarding easy. And, in the sense that "Nobody's ever been fired for buying IBM", no one's going to get fired for using Okta.
- Workspace ONE by Omnissa: Definitely lesser known than Okta, but I've used and liked it. It's designed with the cloud in mind.
- Keycloak: A free, open-source SSO provider that may be better suited to your use case than the above if it needs to be on-premise.
- Ping Identity Platform: Like Keycloak, Ping has on-prem options for you, and may be preferable if you want service and support.